Lotus Pose (Padmasana) Benefits, Steps and Common Mistakes
Learn How to Practise Lotus Pose Safely With Better Hip Mobility, Comfortable Breathing and Body Awareness
By Dav Jones, Senior Yoga Teacher and Teacher Trainer
Lotus Pose is one of the most recognisable postures in yoga.
You will often see it in meditation practices, traditional yoga illustrations and seated breathing exercises. Its symmetrical shape can look simple, but finding a comfortable Lotus Pose requires more than just folding your legs and placing your feet on your thighs.
The position depends heavily on hip mobility, external rotation and the ability to move into the posture without placing unnecessary stress on the knees.
When someone asks me how to improve their Lotus Pose, I don’t believe the answer is to force the legs into position or spend longer trying to achieve the full shape.
Instead, I encourage students to understand how their hips move, develop the necessary mobility gradually and learn to recognise the difference between a useful stretch and uncomfortable joint pressure.
Lotus Pose, also known as Padmasana, can be a useful position for meditation, breath awareness and seated yoga practices when it is appropriate for your body.
However, it isn’t a posture that everyone needs to achieve.
In this guide, we’ll explore how to practise Lotus Pose, the potential benefits, preparation exercises, common mistakes and ways to adapt the position to suit your current level of mobility.
We’ll also look at how to approach the pose without forcing flexibility or treating the full expression as the only successful outcome.
What Is Lotus Pose (Padmasana)?
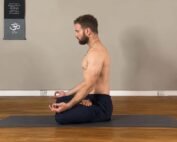
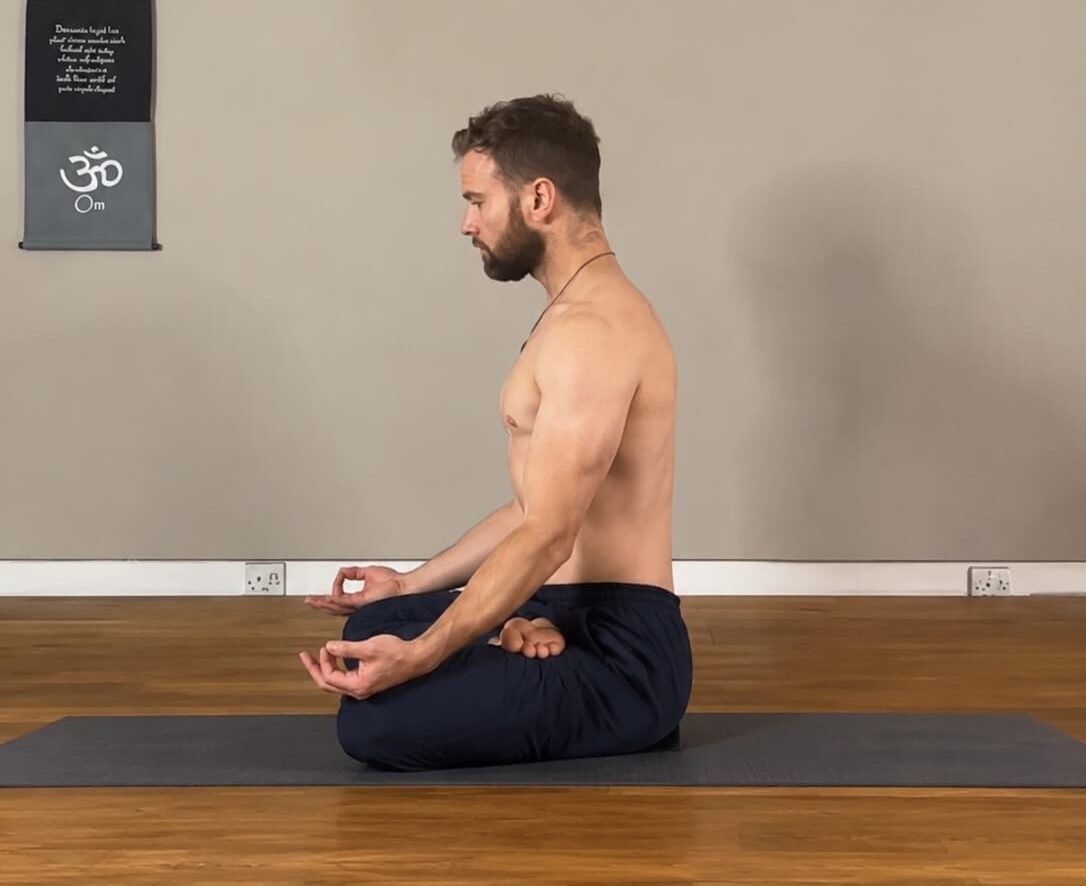
Lotus Pose is a traditional seated yoga posture in which each foot rests on the opposite thigh.
The legs form a symmetrical shape, while the spine is generally held upright and the hands can rest on the knees or thighs.
The Sanskrit name Padmasana comes from Padma, meaning lotus, and Asana, meaning posture or seat.
Lotus Pose is commonly associated with meditation, pranayama and practices that involve sitting still for an extended period.
Although the final position may appear relaxed, the hips need sufficient external rotation for the legs to fold comfortably into place.
This is important because the knees are not designed to provide the same range of rotational movement as the hip joints.
If the hips cannot rotate sufficiently, forcing the feet into position may create unwanted stress around the knees.
For this reason, the aim should be to develop the mobility needed for the posture rather than forcing your body to match a particular shape.
You can also develop a meaningful seated meditation practice without practising full Lotus Pose.
Benefits of Lotus Pose
Lotus Pose is often associated with meditation and stillness. Its potential benefits depend on how comfortably you can access the position and how you incorporate it into your wider practice.
1. Supports a Seated Meditation Practice
One of the main reasons people practise Lotus Pose is to create a stable seated position for meditation.
When the hips and knees are comfortable, the symmetrical arrangement of the legs may help you maintain a steady seat.
This can make it easier to direct your attention towards your breathing or a meditation practice.
However, stability doesn’t require full Lotus Pose. Sitting on a cushion, using a cross-legged position or sitting on a chair can provide suitable alternatives.
2. Encourages Awareness of Posture
Lotus Pose can encourage you to pay attention to how you organise your body while sitting.
You may become more aware of your pelvis, spine, shoulders and head.
If you find yourself rounding through the lower back or struggling to sit upright, raising the hips on a folded blanket or meditation cushion may make the position more comfortable.
The goal is not to maintain a rigid spine. Instead, aim for a balanced position that allows you to breathe naturally without unnecessary tension.
3. Develops Awareness of Hip Mobility
The full expression of Lotus Pose requires substantial external rotation at the hips.
Working towards the posture can help you understand your current range of movement and identify where additional mobility work may be useful.
It is important to distinguish between developing comfortable hip mobility and forcing the body into a fixed position.
Not everyone has the same hip structure or available range of motion. Some people may never find full Lotus Pose comfortable, even with regular practice.
That doesn’t mean their yoga practice is incomplete.
4. Creates an Opportunity for Breath Awareness
Lotus Pose is often used during breathing exercises because it can provide a relatively stable seated position.
When the legs are comfortable and the torso is well supported, you can direct your attention towards the natural movement of your breath.
You don’t need to force deep inhalations or prolonged exhalations.
Simply noticing your breathing can be a useful part of a mindful yoga practice.
5. Provides a Traditional Meditation Seat
Padmasana has a long-standing place in traditional yoga and meditation practices.
For practitioners who can access it comfortably, the posture can become a familiar position for sitting quietly, observing thoughts and cultivating concentration.
The value comes from how the posture supports your practice, not from how advanced it looks.
If another seated position allows you to meditate comfortably for longer, there is no need to replace it with Lotus Pose.
How to Do Lotus Pose Step by Step
Before attempting Lotus Pose, spend some time exploring your hip mobility.
If you already know that you experience knee pain, have a recent knee or hip injury, or find cross-legged sitting uncomfortable, choose a more suitable alternative rather than testing your limits in the full posture.
Step 1. Find a Comfortable Seated Position
Begin by sitting on the floor with your legs extended in front of you.
If your pelvis tends to roll backwards, place a folded blanket or firm cushion underneath your sitting bones.
This can help you establish a more comfortable starting position.
Bend your knees and bring your legs into a simple cross-legged seat.
Notice how your hips and knees feel before attempting to move further.
Step 2. Prepare the Hips
Sit upright and allow your knees to bend naturally.
Gently explore external rotation at the hips without pushing your knees down towards the floor.
You might find it helpful to practise a supported cross-legged position or a gentle reclining hip-opening exercise first.
Keep the movement controlled and stay within a comfortable range.
The aim is to prepare the hips, not to force the legs into a deeper position.
Step 3. Bring One Foot Towards the Opposite Thigh
If your hips move comfortably and you have no knee discomfort, begin working towards the first half of Lotus Pose.
Bend one knee and guide the foot towards the opposite thigh, using your hands to support the leg if necessary.
Avoid pulling forcefully on the foot or twisting the knee to make it reach.
If the position creates pressure around the knee, release it and return to a more comfortable seated variation.
You do not need to continue if your body is resisting the movement.
Step 4. Explore the Second Leg Only If Comfortable
The full expression of Lotus Pose involves placing the second foot on the opposite thigh.
This requires additional hip rotation and may not be accessible to everyone.
Only explore this step if the first leg is comfortable and the second hip can move freely enough to allow the foot to reach its position without forcing the knee.
Move slowly and avoid using your hands to pull the foot into place at the expense of the knee joint.
If the position is uncomfortable, remain in a half-Lotus variation or return to an easy cross-legged seat.
Step 5. Establish a Comfortable Upright Position
Once you have found a suitable position, allow your pelvis to settle.
Lengthen through the spine without lifting the chest excessively or tightening the shoulders.
Rest your hands on your thighs or knees.
Keep the jaw relaxed and allow your breathing to remain natural.
You should be able to sit without needing to constantly adjust your legs or brace against discomfort.
Step 6. Stay for a Few Comfortable Breaths
Begin with a short period of stillness.
Notice how your hips, knees and ankles feel.
If you experience pain, numbness, tingling or increasing pressure, come out of the position carefully.
There is no need to hold Lotus Pose for a particular length of time.
Comfort, control and awareness are more important than duration.
How to Improve Your Lotus Pose
If full Lotus Pose is not currently accessible, there are several ways to prepare your body without forcing the final position.
1. Practise Supported Cross-Legged Sitting
Start with a simple cross-legged position and raise your hips on a cushion or folded blanket.
This can help reduce the effort required to sit upright and may make the position more comfortable.
Allow the knees to rest at their natural height rather than pushing them towards the floor.
Spend a few comfortable breaths noticing your posture.
2. Explore Gentle Hip External Rotation
Hip external rotation is an important component of Lotus Pose.
You can explore this movement through comfortable seated or reclining exercises that allow the thigh to rotate without forcing the knee.
Move slowly and pay attention to the sensation around the hip joint.
A strong stretch is not a requirement, and joint pressure is not a sign that the exercise is working.
3. Practise Bound Angle Pose
Bound Angle Pose, also known as Baddha Konasana, is a common seated posture used to explore hip movement.
Sit with the soles of your feet together and allow your knees to move outwards naturally.
Place cushions or blocks underneath your thighs if they need additional support.
Avoid bouncing the knees or pressing them down with your hands.
Remember that Bound Angle Pose and Lotus Pose involve different positions and movement demands. Comfort in one does not automatically mean that full Lotus Pose will be suitable for you.
4. Work With Half Lotus
Half Lotus is a variation in which one foot rests on the opposite thigh while the other leg remains in a more accessible position.
It may provide a useful alternative for meditation if the position feels comfortable.
However, Half Lotus can still place considerable stress on the knee if the hip does not have sufficient external rotation.
Use support where needed and do not force the raised foot into position.
You can also alternate the side on which you practise, provided both sides are comfortable.
5. Build Consistency Without Forcing Progress
Improving mobility is a gradual process.
Rather than repeatedly testing whether you can achieve full Lotus Pose, focus on comfortable movement, controlled hip mobility exercises and suitable seated positions.
Some practitioners will gradually develop the range needed for the posture. Others may find that their anatomy limits the available movement.
Both outcomes are normal.
A sustainable yoga practice should help you understand your body rather than encourage you to ignore its signals.
Common Mistakes in Lotus Pose
Lotus Pose can look effortless when someone is sitting comfortably in the final position. However, several common mistakes can make the posture unnecessarily uncomfortable.
1. Forcing the Knees Towards the Floor
One of the most common mistakes is using the hands to push the knees down in an attempt to deepen the stretch.
This does not necessarily improve hip mobility and may place unwanted stress on the knees.
Allow the legs to rest where they naturally fall.
2. Pulling the Feet Into Position
Using your hands to pull the feet onto the opposite thighs can encourage you to move beyond your available range of hip rotation.
If the foot does not reach the thigh comfortably, stop and choose an easier variation.
The final shape should not come at the expense of joint comfort.
3. Ignoring Knee Discomfort
A stretch around the outer hip may be expected during some mobility exercises, but pain around the knee should not be ignored.
The knee may be experiencing rotational stress when the hip cannot provide enough movement.
Come out of the posture if you experience pain, pinching or increasing pressure.
Do not attempt to work through these sensations.
4. Rounding the Lower Back
Trying to sit upright in Lotus Pose without sufficient support can cause the pelvis to tilt backwards.
This may lead to excessive rounding through the lower back.
Try sitting on a firm cushion or folded blanket to make it easier to maintain a comfortable, balanced position.
You do not need to hold an exaggerated arch in your back.
5. Holding the Pose for Too Long
Spending a long time in an uncomfortable position does not automatically improve flexibility.
If you are new to Lotus Pose, begin with a more accessible seated variation and build your practice gradually.
Pay attention to how your knees, hips and ankles respond.
6. Comparing Your Pose With Someone Else’s
People have different proportions, joint structures and movement capabilities.
Someone else’s Lotus Pose may not be an appropriate reference for your body.
Instead of measuring progress by how closely you match a photograph, focus on developing a comfortable and sustainable practice.
A Simple Yoga Practice to Prepare for Lotus Pose
You don’t need an advanced flexibility routine to begin exploring the movements associated with Lotus Pose.
The following sequence offers a gentle starting point, provided the exercises feel comfortable for you.
1. Supported Cross-Legged Seat
Sit on a cushion or folded blanket with your legs crossed.
Spend several comfortable breaths observing your posture.
Allow your shoulders to relax and your spine to lengthen naturally.
2. Bound Angle Pose
Bring the soles of your feet together and allow the knees to move outwards without pushing them down.
Use cushions beneath the thighs if needed.
Stay for a few comfortable breaths, then release.
3. Gentle Reclining Hip Rotation
Lie on your back with your knees bent and feet resting on the floor.
Explore a small, controlled movement of one thigh outwards, keeping the range comfortable.
Return to the starting position before changing sides.
Avoid pushing through the knee or using your hands to force the leg further.
4. Easy Cross-Legged Meditation
Return to a supported cross-legged seat.
Allow your hands to rest on your thighs and notice the natural rhythm of your breathing.
Stay for a short period, changing your position whenever necessary.
This simple practice gives you an opportunity to explore hip movement and seated posture without making full Lotus Pose the goal.
How Long Should You Hold Lotus Pose?
There is no single holding time that suits everyone.
If Lotus Pose is comfortable and appropriate for your body, you might begin with a short period of sitting and gradually adjust the duration according to your experience.
If you are practising meditation, you can also change your seated position whenever you need to.
You do not need to remain in the posture to prove that you have developed sufficient flexibility.
For beginners, a supported cross-legged seat may be a better starting point than full Lotus Pose.
The priority is to maintain a position that allows you to breathe naturally and remain attentive without experiencing pain or unwanted pressure.
Is Lotus Pose Suitable for Everyone?
No. Lotus Pose is not suitable for every practitioner.
Your available hip rotation, joint structure, previous injuries and current mobility can all influence whether the posture is appropriate.
If you have knee or hip problems, a recent injury, or a history of discomfort when sitting cross-legged, seek guidance from a qualified healthcare professional or appropriately trained movement professional before attempting the full posture.
Avoid Lotus Pose if it causes pain, numbness, tingling or significant joint pressure.
If your goal is meditation, there are many alternatives, including an easy cross-legged seat, sitting on a chair or using a supported kneeling position.
You can develop concentration, breath awareness and a consistent meditation practice without achieving Padmasana.
The most appropriate posture is one that supports your practice while respecting your body’s current capabilities.
Final Thoughts
Lotus Pose is a traditional yoga posture with an important place in seated meditation and breath awareness.
However, its value should not be measured by how quickly you can achieve the full position.
When working towards Padmasana, give yourself time to understand your hip mobility, practise suitable preparation exercises and recognise when a variation is more appropriate.
Avoid forcing your knees towards the floor or pulling your feet into position.
Use support when needed, keep your breathing comfortable and come out of the posture if you experience pain.
Most importantly, remember that you do not need to master Lotus Pose to have a meaningful yoga practice.
A comfortable seated position can be just as valuable for meditation, awareness and stillness.
Focus on consistency rather than comparison.
Develop mobility without forcing your range.
Allow your practice to adapt to your body rather than expecting your body to fit a particular posture.
Move with awareness. Breathe comfortably. Respect your body’s limits.
If you would like to explore these principles further, join my online yoga classes on Patreon or discover the A.W.A.R.E. Method through DJY Mentorship, where we explore biomechanics, functional mobility, strength and movement strategies tailored to the individual.