 Skip to content
")
The 5 Poses Yoga for Lower Back Pain
A Practical Guide to Reducing Tension, Building Support, and Moving With More Ease
By Dav Jones, Senior Yoga Teacher and Teacher Trainer
Lower back pain changes the way you move.
You notice it when getting out of bed.
When bending forward.
When sitting too long.
Sometimes even walking feels different.
For many people, the body slowly becomes protective around pain.
Muscles tighten.
Breathing becomes shallow.
Movement becomes cautious.
And over time, the body can start feeling stiff, weak, and disconnected.
This is where yoga can become incredibly valuable.
Not because yoga magically “fixes” pain overnight.
But because mindful movement helps the body relearn:
- Nervous System Homeostasis
- Stability
- Coordination
- Breath control
- Relaxation
- Efficient movement patterns
Most lower back discomfort is not simply about flexibility.
Very often, the body needs:
- Better hip mobility
- Improved core engagement
- More spinal awareness
- Less unnecessary tension
- Better control during movement
This is why gentle, intelligent yoga can make such a difference.
In this guide, you’ll explore 5 yoga poses for lower back pain that help reduce stiffness, improve support around the spine, and help your body move with more confidence again.
These poses are not about pushing deeper.
They’re about creating space, strength, and awareness.
Why Yoga Helps Lower Back Pain
The lower back rarely works alone.
When the hips become stiff, the lower back compensates.
When the core becomes weak, the spine absorbs more pressure.
When breathing becomes restricted, tension often increases throughout the body.
Over time, this creates inefficient movement patterns.
The body begins relying on compression instead of support.
Yoga helps interrupt that cycle.
When practiced correctly, yoga can:
- Improve spinal mobility
- Strengthen supportive muscles
- Release excess tension
- Improve posture
- Enhance breathing mechanics
- Create better body awareness
And perhaps most importantly:
Yoga teaches you how to move without fighting your body.
The goal is not extreme flexibility.
The goal is sustainable movement.
1. Cat Cow Pose (Marjaryasana Bitilasana)


Cat Cow Pose is one of the most effective movements for improving spinal mobility gently.
Instead of aggressively stretching the lower back, this pose teaches the spine how to move segment by segment.
That matters.
Many people with lower back discomfort move from only one area of the spine repeatedly. Over time, this creates stiffness and irritation.
Cat Cow helps redistribute movement more evenly.
Why It Helps
This pose:
- Mobilizes the spine
- Improves pelvic awareness
- Encourages coordinated breathing
- Reduces stiffness from sitting
- Helps the nervous system relax
The gentle rhythm also improves circulation around the spinal muscles.
Beginner
- Move slowly
- Keep the range of motion small
- Focus on breathing steadily
- Don’t force spinal rounding or arching
Intermediate
- Coordinate movement fully with breath
- Press hands firmly into the floor
- Actively engage abdominal muscles during Cat Pose
Experienced
- Slow the movement dramatically
- Explore spinal articulation vertebra by vertebra
- Focus on smooth movement transitions
Common Mistakes
- Moving too quickly
- Dumping into the lower back
- Holding the breath
- Overarching the neck
The movement should feel fluid, not aggressive.
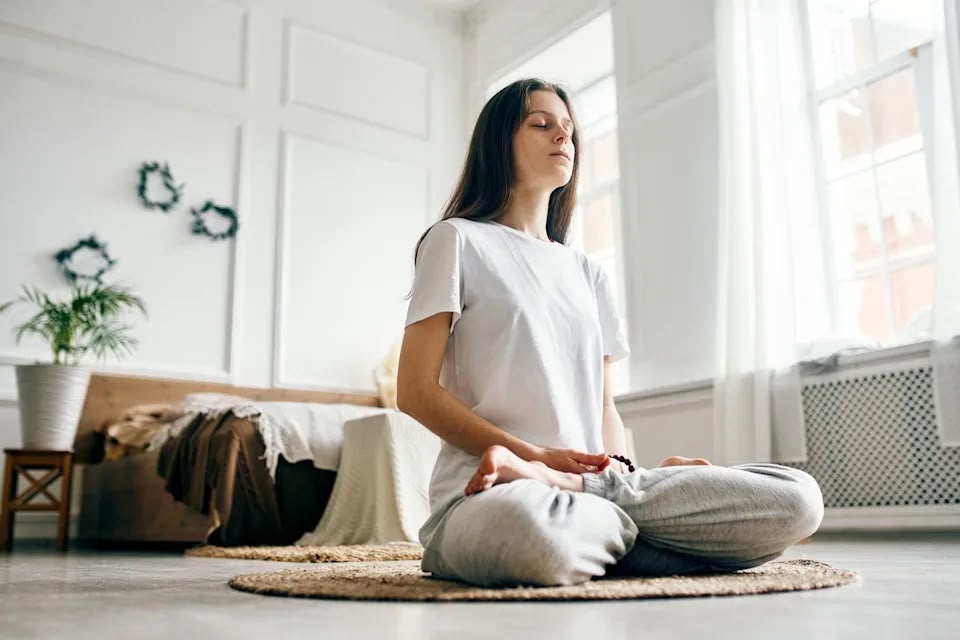
2. Child’s Pose (Balasana)

Child’s Pose is often underestimated.
Many people think it’s simply a “resting pose,” but when practiced mindfully, it becomes a powerful way to decompress the spine and calm the nervous system.
Lower back pain is not always just physical tension.
Stress, fatigue, and nervous system overload can increase muscular guarding around the spine.
Child’s Pose helps create a sense of safety in the body.
Why It Helps
This pose can:
- Lengthen the lower back gently
- Relax hip tension
- Encourage diaphragmatic breathing
- Reduce nervous system stress
- Improve spinal decompression
Breathing into the back ribs during this pose can feel incredibly therapeutic.
Beginner
- Separate the knees wider
- Rest the forehead on stacked hands
- Focus on slow breathing
Intermediate
- Extend arms actively forward
- Relax hips toward heels
- Stay for longer holds
Experienced
- Deepen breath awareness
- Expand breath into the lower back
- Relax unnecessary muscular tension completely
Common Mistakes
- Forcing hips to heels
- Holding tension in the shoulders
- Breathing shallowly
- Treating the pose passively without awareness
The real benefit comes from conscious relaxation.
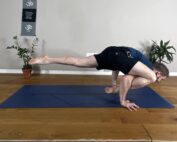
3. Sphinx Pose
Many people with lower back pain avoid backbends completely.
But gentle spinal extension is often extremely beneficial when introduced intelligently.
Sphinx Pose creates mild activation through the spinal muscles while encouraging openness across the front body.
The key is moderation.
This is not about forcing flexibility into the lower back.
It’s about improving support and mobility around the spine.
Why It Helps
Sphinx Pose can:
- Strengthen spinal stabilizers
- Improve posture
- Open the chest
- Counteract excessive sitting
- Build tolerance for spinal extension
For people who spend hours sitting daily, this pose often feels surprisingly relieving.
Beginner
- Keep elbows slightly forward
- Lift the chest gently
- Avoid pushing too high
Intermediate
- Press forearms firmly down
- Lengthen through the crown of the head
- Engage lower abdominal muscles lightly
- Lift pelvic floor and engage glutes
Experienced
- Maintain active leg engagement
- Broaden through the collarbones
- Explore controlled extension evenly through the spine
Common Mistakes
- Compressing the lower back
- Shrugging shoulders upward
- Holding glutes excessively tight
- Pushing too deeply
The pose should feel supportive, not sharp or compressed.
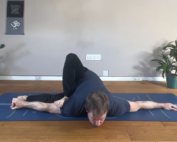
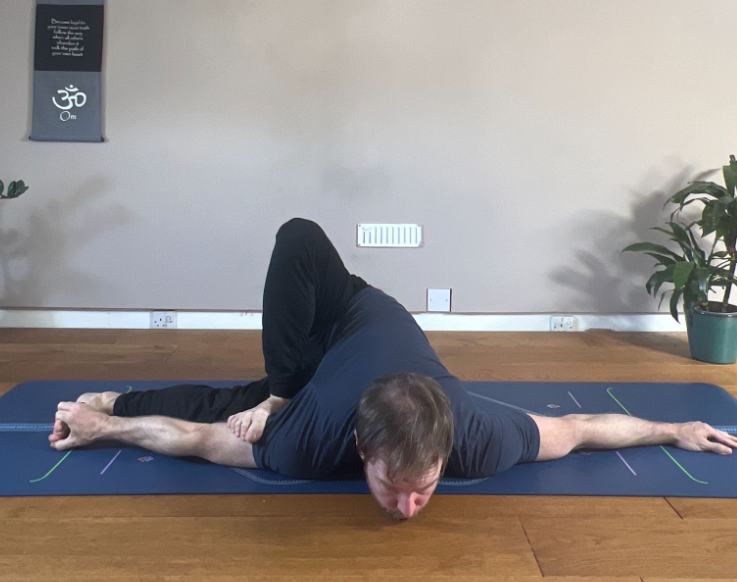
4. Supine Twist (Supta Matsyendrasana)
Twisting poses can help release accumulated tension around the lower back, hips, and outer waist.
But the real benefit is not forcing spinal rotation.
It’s allowing the body to soften gradually.
Twists also improve awareness between the upper and lower body.
For many people, this creates a feeling of spaciousness through the spine.
Why It Helps
This pose may:
- Reduce muscular tension
- Improve spinal rotation gently
- Relax the nervous system
- Improve breathing capacity
- Release hip tightness
The floor also provides support, making the pose feel safe and grounded.
Beginner
- Keep knees bent
- Move slowly into the twist
- Keep shoulders comfortable
Intermediate
- Extend one leg if comfortable
- Stay longer in the position
- Relax fully with the breath
Experienced
- Focus on spinal length before rotation
- Deepen the twist gradually
- Explore relaxation instead of intensity
Common Mistakes
- Forcing the knees downward
- Twisting too aggressively
- Lifting shoulders excessively
- Holding tension in the jaw or neck
Twists should feel calming, not forceful.
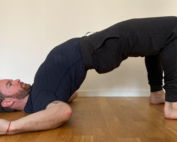
5. Bridge Pose (Setu Bandhasana)

Bridge Pose strengthens areas that directly support the lower back:
- Glutes
- Hamstrings
- Posterior chain muscles
Weakness in these areas often causes the lower back to overwork unnecessarily.
Bridge Pose helps redistribute effort more efficiently throughout the body.
This is one reason it’s so effective.
Why It Helps
Bridge Pose can:
- Strengthen the hips
- Improve pelvic stability
- Support posture
- Reduce lower back compensation
- Improve spinal support
It teaches the body how to generate support from the legs and hips rather than the sole support coming from the lower back muscles alone.
Beginner
- Lift hips gently
- Engage glutes lightly
- Keep movements small
- Focus on smooth breathing
Intermediate
- Hold the pose longer
- Engage glutes lightly
- Maintain knee alignment
Experienced
- Move slowly with control
- Create even activation through the posterior chain
- Focus on full-body integration
Common Mistakes
- Overarching the lower back
- Pushing hips too high
- Knees collapsing outward
- Holding tension in the neck
The lift should feel supported, not forced.
Simple Yoga Flow for Lower Back Pain
You do not need a long practice to feel benefits.
Consistency matters more than intensity.
Try this gentle sequence:
- Cat Cow Pose – 1 minute
- Child’s Pose – 8 breaths
- Sphinx Pose – 30 to 45 seconds
- Supine Twist – 5 breaths each side
- Bridge Pose – 8 slow repetitions
Repeat the sequence 1 to 2 times.
Total practice time:
15 to 20 minutes
This is often enough to help the body reset after long periods of sitting, stress, or stiffness.
Common Mistakes When Practicing Yoga for Lower Back Pain
1. Stretching Too Aggressively
Pain does not always mean the body needs deeper stretching.
Often it needs better support and control.
2. Ignoring Breath
Breath directly affects muscular tension.
Shallow breathing often increases stiffness.
3. Moving Too Fast
Slow movement improves awareness.
Fast movement often hides compensation patterns.
4. Forcing Flexibility
The spine responds better to gradual, intelligent movement.
5. Practicing Through Sharp Pain
Discomfort and effort are different from sharp pain.
Always respect your body’s signals.
Final Thoughts
Lower back pain can feel frustrating because it affects everyday life so easily.
But movement done with awareness can change how your body feels over time.
These yoga poses help create:
- Better support
- Improved mobility
- Stronger movement patterns
- Reduced tension
- Greater confidence in movement
The goal is not perfection.
The goal is learning how to move in a way that feels sustainable.
Over time, something important begins to happen.
You stop bracing against movement.
You stop fearing movement.
You begin trusting your body again.
This is where yoga becomes truly powerful.
Not through forcing flexibility.
But through intelligent movement, patience, and consistency.
Even 15 minutes of mindful practice can:
- Improve posture
- Reduce stiffness
- Increase mobility
- Help the body feel supported again
Small steps practiced consistently create lasting change.
If you want to go deeper into this approach,
Join my online classes on Patreon or explore the DJY Mentorship Program, where we focus on intelligent movement and long-term progress.


