 Skip to content

Unlocking the Gate Pose (Parighasana): A Complete Guide
Welcome to Parighasana, or Gate Pose—a yoga posture that opens pathways to flexibility, strength, and mindfulness. As you explore this pose, you’ll discover its profound physical and mental benefits, guided by insights from both yoga and kinesiology. In this guide, we’ll break down the biomechanics and therapeutic applications of Parighasana to help you deepen your practice while safeguarding your joints and muscles.
Guided by insights from Dav Jones, this comprehensive guide dives deep into the essence, techniques, and therapeutic applications of Parighasana to help you master the pose and unlock your full potential.
What is Parighasana?
Parighasana is a yoga pose that stretches the lateral region of the body. This pose also helps to engage multiple muscle groups that provide hip and spinal stability. This pose is ideal for improving flexibility, building core strength, and enhancing overall mobility. Though it may appear simple, Parighasana involves complex movement patterns that challenge balance, coordination, and muscular control.
Etymology of Parighasana
In Sanskrit:
- Parigha: Gate latch or bar
- Asana: Pose or posture
This symbolic imagery of a “gate latch” reflects the unlocking of energy pathways in your body, connecting physical alignment with mental clarity. In practice, Parighasana creates space—both within your body and in your mind—allowing you to experience freedom in movement and thought.
Kinesiological Benefits and Preparatory Poses
Prepare your body with these essential poses to warm up, increase flexibility, and prevent strain during Parighasana:
-
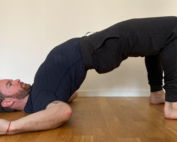
Cat-Cow Pose (Marjaryasana-Bitilasana):


Gently mobilizes the spine, activates your core, and enhances spinal awareness.
-
Baddha Konasana (Butterfly Pose):
")
Stretches the lower back, opens the inner hips.
-
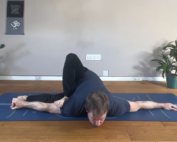
Low Lunge (Anjaneyasana):
")
Lengthens hip flexors, stretches the quadriceps, and lengthens the external abdominal oblique of the abdomen.
Step-by-Step Guide to Performing Parighasana

Mastering Parighasana begins with preparation and alignment. Let’s break it down step-by-step.
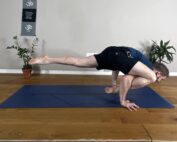
How to Perform Parighasana
1. Start in a Kneeling Position:
Begin kneeling on your yoga mat, ensuring your knees are hip-width apart.
2. Extend One Leg:
Stretch your right leg out to the side and invert your ankle pressing the outer edge of the foot into the mat.
3. Stabilise Your Torso:
Engage the Glute muscles of the bent-leg to provide foundation for the hips. Externally rotate and depress the shoulder of the supported arm to stabilise the upper body.
4. Focus Your Gaze:
First, look down to the supporting hand. Then once you’ve integrated the step 3 and have stability, slowly start to look up towards the top hand.
5. Breathe Mindfully:
Inhale to lengthen the spine, feeling the ribcage expand, and exhale to deepen the lateral stretch, allowing the intercostal muscles to open and the side body to lengthen.
6.Repeat on the Other Side:
Return to kneeling and repeat on your other side.
Breathing Techniques
- Inhale: Expand the top ribs. Notice how your inhale creates length in your side body.
- Exhale: Sink deeper into the lateral bend while maintaining engagement in the supporting muscles to prevent collapsing into the pose.
Benefits of Parighasana
From a kinesiological perspective, Parighasana offers numerous physical and mental benefits:
Physical Benefits
- Improves Flexibility: By focusing on lateral flexion, this pose stretches the obliques, intercostal muscles, hamstrings, and adductors, improving range of motion in the spine and hips.
- Builds Strength: Engages the deep core muscles (transverse abdominis, obliques) and leg muscles, including the quadriceps, glutes, and stabilizers of the legs. The supporting arm also activates shoulder stabilizers like the rotator cuff.
- Enhances Posture: Through organic core activation and spinal alignment, Parighasana reinforces efficient posture by lengthening the spine and strengthening the muscles that support an upright stance.
Physiological Benefits
- Boosts Lung Capacity: The lateral stretch opens the intercostal muscles between the ribs, allowing for a fuller expansion of the lungs and improving overall respiratory function.
- Stimulates Digestion: Due to the nature of the posture, engagement of the abdominal muscles and twisting gently in the torso, Parighasana promotes healthy circulation to the digestive organs, aiding in digestion.
- Promotes Circulation: The movement encourages better blood flow to the torso, hips, and legs, contributing to improved circulation throughout the body.
Mental Benefits
- Reduces Stress: The controlled breathing and mindful side-body stretch help release tension stored in the ribs, diaphragm, and shoulders, promoting relaxation.
- Enhances Clarity: Parighasana encourages focus and mindfulness, helping you cultivate a sense of calm as you connect breath with movement.
Avoid These Common Mistakes
Parighasana might look straightforward, but small misalignments can reduce its effectiveness or lead to compensations. Avoid these pitfalls:
Misalignments to Watch
- Collapsing the Chest: Keep your chest open and lifted to avoid compressing the lungs and overloading the spine.
- Over-Twisting: Ensure that the movement remains a lateral bend, target the obliques and work on muscle activation through the legs and supported arm.
- Stability in the Shoulders: Keep the shoulder of the supported arm in external rotation and shoulder depression.
Safety Tips:
- Use props (like blocks) if needed to maintain alignment without strain.
Variations and Modifications
To make Parighasana more accessible or to deepen your practice, consider these modifications:
Beginner-Friendly Modifications
- Use a block or strap to support your hand if reaching your shin or ankle feels challenging.
- Support your back up against a wall to take out the balancing challenge of the pose.
Advanced Variations
- Add a bind by lifting the straight leg, bending the knee and finding the foot with the free hand.
- Backbend your spine from here to add in a stretch for the anterior (front) body.
With Props
While Dav Jones Yoga prefers not to emphasize props, they can be helpful for those exploring this pose for therapeutic benefits.
Safety and Contraindications
While Parighasana is generally safe, certain conditions may require modifications:
Who Should Be Careful?
- Knee Pain: Place extra cushioning under your kneeling knee to reduce pressure on the joint.
- Back Issues: Avoid over-arching the spine.
- Pregnancy: Modify the pose by widening the stance and avoiding deep lateral bending to reduce compression on the belly.
Practice Safely
- Warm up adequately before attempting Parighasana.
- Stay within your limits, avoiding any discomfort.
Integrating Parighasana into Your Routine
Parighasana is a great addition to your yoga practice for improving lateral flexibility and core strength. Here are some tips for integrating it smoothly:
Sequencing Tips
- Perform it after warming up with Sun Salutations or low lunges to ensure flexibility in the hips and hamstrings.
- Pair it with Triangle Pose and Warrior II for a balanced lateral stretch series.

Final Thought
Parighasana, or Gate Pose, is more than just a side stretch—it’s an opening to flexibility, balance, and mindfulness. With regular practice and thoughtful adjustments, you’ll unlock both physical strength and inner calm.
For further personalized instruction and to enhance your practice, consider joining the Dav Jones Yoga Patreon Channel. Here, you’ll find a comprehensive library of classes suitable for yogis at all levels. If you’re looking for more tailored guidance, the DJY Mentorship programs offer an in-depth, personalized approach to help you delve deeper into the practice of Yoga not only from the physical practice but from the philosophical teachings also.


