

Master Flying Pigeon Pose (Eka Pada Galavasana): Ultimate Guide for Balance & Strength
Welcome to our guide on the Flying Pigeon Pose! I’m Dav Jones, and I’m here to help you with your yoga practice. In this blog, we’re focusing on the Flying Pigeon Pose today. We’ll cover its benefits, how to do it safely step-by-step, and some preparatory poses. If you want to grow in your yoga asana practice, you’re in the right place. Let’s start this journey together.
Stretches Before Attempting Flying Pigeon Pose
Before attempting this pose, it’s crucial to warm up and prepare your body sufficiently. Warm-up the wrists sufficiently (10/15 minutes) before beginning the steps below.
This preparation will help ensure a safer practice and make it easier to enter the pose. Here’s how you can get started.
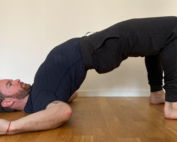
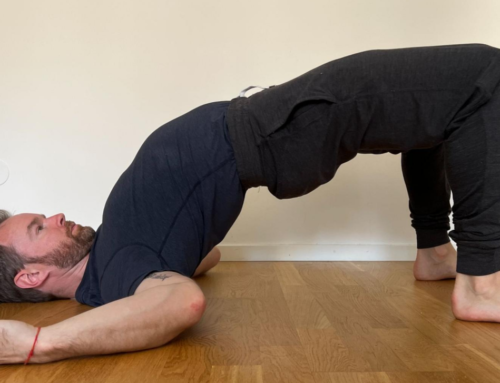
Downward Facing Dog (Adho Mukha Svanasana)
A key pose for strengthening, stretching, and warming up the body, focusing on the shoulders, hamstrings, and calves.

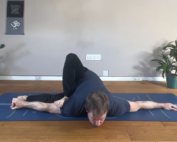
Pigeon Pose (Eka Pada Rajakapotasana)
A key preparatory pose that opens the hips and prepares them for the deep hip flexion and hip external rotation required in Flying Pigeon.

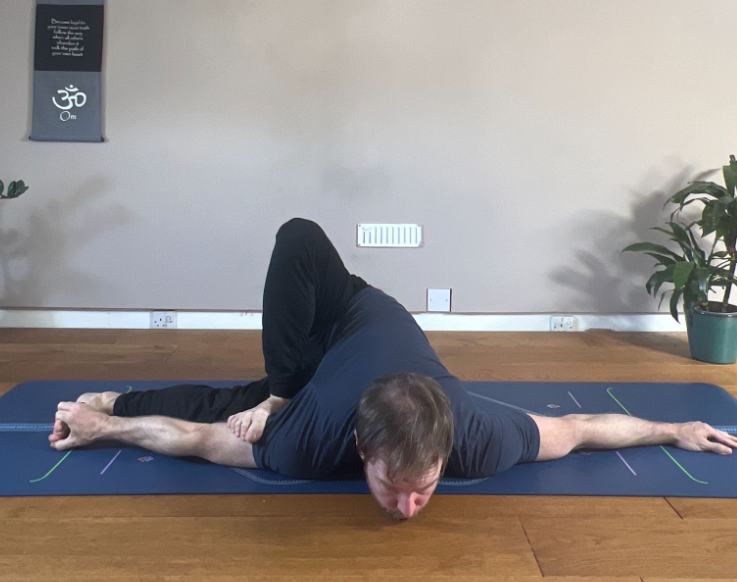
Lizard Pose (Utthan Pristhasana)
Deeply stretches the hip flexors, hamstrings, and adductor muscles, preparing the hips for the complexities of the Flying Pigeon Pose.
")
A foundational exercise that strengthens the core, arms, and shoulders, while also enhancing stability and posture.

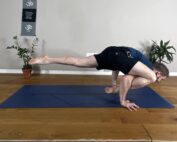
Specifically targets the core muscles and hip flexors, improving balance and stability which are crucial for arm balance postures.
")
A foundational arm balance that builds the strength and confidence needed for more advanced poses like Flying Pigeon.

Step-by-Step Guide to Mastering the Flying Pigeon Pose
The Flying pigeon pose (Eka Pada Galavasana) is designed to elevate your balance, flexibility, and concentration. Now, let’s go through how to do the Flying Pigeon Pose step by step.
Step 1: Tadasana (The Mountain Pose)
Tadasana, or Mountain Pose, is the cornerstone of all standing yoga poses, including the preparatory step for advancing into the Flying Pigeon Pose. It’s a seemingly simple pose that teaches the fundamentals of presence, and focused breathing, essential to prepare and ready yourself for the asana practice ahead.
")
Starting your journey into the Flying Pigeon Pose begins from the foundational Standing Position, also known as Tadasana. Here’s how to set this initial stage with precision and mindfulness:
- Feet Position: Stand with feet together or hip-width apart, grounding yourself firmly. This stability is essential for the balance in Pose.
- Body Alignment: Engage your legs and core, keeping your spine long and shoulders relaxed. This alignment supports the transition into the Pose.
- Breath Focus: Maintain deep, even breaths. This focused breathing calms your mind, preparing you for the Pose’s demands.
Step 2: Figure Four Posture
After establishing a strong foundation in Tadasana, move into Figure Four Posture as your next step towards mastering the Flying Pigeon Pose. This pose stretches your outer hips, back body, and also tests your balance.

Primarily, this pose stretches your outer hip muscles and prepares the hips for the necessary mobility that Flying Pigeon Pose demands.
- Transition: Bring one hip/leg into flexion and cross the ankle over the opposite thigh. Bend the standing leg, sitting into the hips.
- Legs: Press the crossed leg down to the standing thigh.
- Arms: Place your hands together in anjali mudra.
- Gaze/Eyes: Focus at a fixed point to maintain balance.
- Breathing: Deepen your fold with each exhale, enhancing flexibility in preparation for the Flying Pigeon Pose.
Step 3: Entering the Pose
Entering the Flying Pigeon Pose requires patience and practice. Focus on maintaining a steady breath as you move through these steps. This phase is crucial for setting up the correct alignment and balance needed to fully achieve the Pose, building strength and flexibility in the process.

After establishing a strong foundation in Tadasana and the Figure Four pose, the next step towards mastering the Flying Pigeon Pose involves entering the pose with mindfulness and precision.
- Hooking One Leg Across The Arms: From the forward fold, lift one leg and place it over the opposite thigh of the standing leg just above the knee – creating a figure-four shape with your legs.
- Bend Forward to Place Your Hands on the Ground: Keep your hands shoulder-width apart, fingers slightly turned outward.
- Shift Your Weight Forward: Begin to transfer your weight onto your hands while keeping the crossed-legged foot flexed and hooked around the arm.
- Round Your Spine and Hug Your Elbows in: This action provides the stability and strength needed from the foundation of the pose.
- Feel the Contraction of Your Core as you lean forward and Lift Your Rear Foot Off the Ground: Try to straighten out the rear knee lifting the rear foot upwards towards the ceiling/sky.
Step 4: Extending the Back Leg
Extending the back leg not only prepares your body for the advanced stages of the Flying Pigeon Pose but also enhances your overall balance, strength, and flexibility. It’s a vital step that bridges all the previous steps in the above sequence and the hand balance to come.

After establishing a strong foundation in Entering the pose, the next step towards mastering the Flying Pigeon Pose involves extending the back leg. This movement is crucial for building the strength and flexibility required for the pose.
- Slowly Extend Your Rear Leg Straight Back Behind You: Remember to keep hugging your arms towards each other and round your spine.
- Keep Your Gaze Fixed on a Focused Point for Balance: This helps maintain concentration and stability.
- Engage Your Muscles: Keep the continuous adduction of your arms. This ensures a strong and stable foundation. Perhaps the most important aspect of the pose is this which ensures the stability of the posture.
- Hold the Pose for 3-5 Breaths: Focus on maintaining balance, strength, and poise in the pose with a constant steady breath.
- Tips for Maintaining Balance and Alignment: Keep your gaze fixed, breathe calmly, and move into the posture mindfully with steadiness and ease.
Exiting the Pose
- Carefully Lower Your Back Leg to the Ground: Start to reverse the steps you took to enter the pose.
- Return to a Standing Position and Repeat on the Ppposite side: Shake out your legs and arms if needed, then prepare to repeat on the opposite side.
By following these detailed steps, you’ll be able to approach the Flying Pigeon Pose with confidence and safety, gradually building up your strength and balance to master this challenging asana.
Benefits of the Flying Pigeon Pose
Practicing the Flying Pigeon Pose offers several health and fitness benefits:
- Enhances Balance and Focus: This pose requires and builds considerable mental focus and physical balance.
- Builds Strength: Strengthens the arms, shoulders, core, and the muscles around the hips.
- Increases Flexibility: Opens up the hips and stretches the thighs, groin, and back muscles, improving overall flexibility.
- Improves Mental Clarity: Balancing poses help improve neurological pathways, boosting memory and concentration.
- Stimulates Digestive Health: The pose’s configuration can aid in digestion and elimination due to abdominal pressure.
Tips and Modifications for Beginners
- Use a Block: To ease into the pose, use a yoga block under your hands for support.
- Practice with a Chair: Try the Figure Four posture while seated to get used to the leg position.
Safety Tips
- Avoid If Injured: Skip this pose if you have recent wrist or shoulder injuries or severe hip issues.
- Warm Up Properly: Always start with a thorough warm-up to prepare your body and prevent injuries.
Final Thought
This is not just a physical challenge it’s a step towards deeper yoga practice, blending strength with grace. Approach it with patience and mindfulness, and see your practice soar. Looking for more guidance or inspiration? Follow Dav Jones Yoga on Instagram for daily tips, Connect with Dav Jones Yoga on the Patreon channel or have a look at the DJY Mentorship programs for a more private, tailored approach to exploring your yoga practice.


