 Skip to content

Discover the Steps and Benefits of Figure 4 Pose (Eka Pada Utkatasana)
Hello! I’m Dav Jones, a yoga teacher and trainer passionate about helping others find balance, strength, and peace through yoga. Today, we’re exploring the Figure 4 Pose, Eka Pada Utkatasana. This pose is a powerful combination of strength, flexibility, and mindfulness, making it a go-to for opening the hips and improving focus. Whether you’re new to yoga or refining your practice, this guide will walk you through everything you need about the Figure 4 Pose—its benefits, variations, and a step-by-step guide to mastering it. Let’s get started!
What is Figure 4 Pose (Eka Pada Utkatasana)?
The Figure 4 Pose is a standing balancing posture that resembles the shape of the number “4” when one leg crosses over the other. It combines strength, flexibility, and focus, engaging the glutes, hips, and core. Often used to stretch the hips and relieve lower back tension, this pose is a favorite in yoga classes worldwide.
Figure 4 Pose Basics:
- Sanskrit Name: Eka Pada Utkatasana
- Pronunciation: Eh-kah Pah-dah Oot-kah-tah-suh-nah
- Pose Type: Standing balance, hip-opener
- Level: Beginner to Intermediate
- Primary Focus: Hip flexibility, balance
The Figure 4 Pose is versatile—it can be performed standing, seated, or reclined—and fits beautifully into any yoga routine.
The Physical and Mental Benefits of Figure 4 Pose
Physical Benefits:
- Improves Hip Flexibility: Opens tight hips which can be linked to longer periods of sitting.
- Strengthens Glutes: Builds stability and engages the Glute muscles in a lengthened position in the standing leg.
- Can help to Ease Lower Back Muscle Tension: Eases tension in the lower back by stretching the piriformis in the hip and the Quadratus Lumborum muscles in the lower back.
- Boosts Balance and Coordination: Challenges stability and balance through the standing ankle and leg. This in turn can help to improve proprioception.
- Can Aid to Relieve Sciatica Symptoms: Figure 4 pose can help to alleviate sciatic nerve symptoms by stretching the muscle/fascial tissue in the outer hips region, especially the piriformis muscles.
Mental Benefits:
- Encourages Mindfulness: Requires focus and presence to maintain balance in the standing version.
- Mobilises the Hips: Releases stored tension in the hips, promoting freedom and an increased range of motion.
- Enhances Confidence: Overcoming the challenge of balancing builds self-assurance.
Preparatory Poses for Figure 4
Before diving into the pose, prepare your body with these stretches:
")
Loosens the lower back, hips, promoting relaxation.
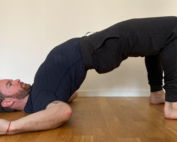
- Thread the Needle Pose (Parsva Balasana):
")
Mobilizes the thoracic spine, relieving tension in the shoulders.

Stretches tight hip flexors and contracts the hip extension muscles.
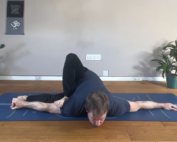
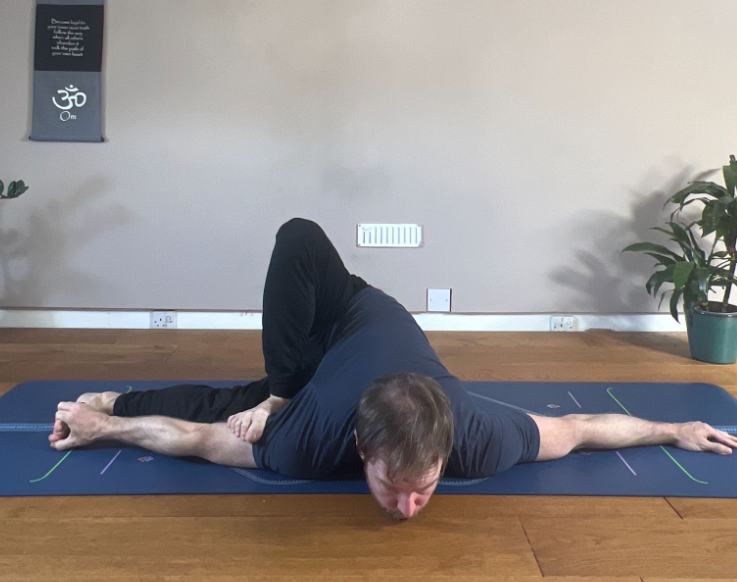
- Eka Pada Rajakapotanasana (Pigeon Pose)
")
Stretches muscles/fascial tissue in the outer hip region in the front leg, and stretches the hip flexor muscles in the rear leg.
Step-by-Step Guide to Figure 4 Pose
Standing Variation:
- Begin in Mountain Pose (Tadasana)
Stand tall, with feet hip-width apart, and ground your weight evenly through both feet. - Shift Weight onto One Leg
Transfer your weight to your right leg, keeping it strong and stable with a slight bend in the knee. - Balance in ‘Figure 4’
Cross your left ankle over your right thigh, just above the knee. Flex your left ankle to contract the muscles in the lower leg and turn your toes downwards to create an external rotation in the tibia. - Bend into Your Standing Leg
Lower your hips as if sitting in a chair. Keep your hands in prayer position or rest them on your bent knee for stability. - Hold the pose and Breathe
Stay for 5-10 breaths, then switch sides. Play with lowering the hips to a height which suits your flexibility range. The lower you go, the more of an intense stretch you tend to experience. This is subjective of course.
Reclined Variation:

- Lie on your back with your knees bent and feet flat.
- Cross your left ankle over your right thigh.
- Thread your hands behind your right thigh and gently pull toward your chest.
- Hold for 5-10 breaths, then switch sides.
Modifications and Variations
- Seated Figure 4 version:

This seated version takes out the added challenge of the balance and can be helpful getting more of a stretch out of the hips.
2. Reclined Twisted Figure 4 Variation:

This variation can add a little nuance to figure 4 by introducing a twist to the lumbar spine.
3. Figure 4 Against the Wall

Use a wall for balance for support and as a tool to access more leverage in deepening the stretch intensity.
Incorporating Figure 4 Pose into Your Yoga Routine
- Morning Stretch: Start your day with this pose to loosen up tight hips.
- Warm-Up Sequence: Pair with Downward Dog and Low Lunge for a flowing practice.
- Cool-Down Pose: Use it to release tension after an intense workout or run.
Practice Considerations
- Forcing the Stretch: Work within your range of motion and avoid forcing your joints and tissues into ranges of motion that create pain.
Breathwork and Mindfulness in Figure 4 Pose
Syncing your breath with movement is key to unlocking the pose’s full benefits.
- Inhale: Expand your ribcage front & back, and side to side
- Exhale: Option to deepen the stretch and uptake the sensations and experience of the posture.
Visualize your breath creating space in your hips and lower back, allowing you to sink deeper into the pose with each exhale.


