 Skip to content

Unfolding the Elegance of Hanumanasana Through This Step-by-Step Approach
Hi, I’m Dav Jones, a dedicated yoga practitioner, and yoga teacher trainer. Today, I’m going to have a look at breaking down Hanumanasana (Front Splits). I’ll share the benefits and variations of the posture while noting any precautions. It’s a great pose for enhancing flexibility and mobility of the hips. Let’s get into it!
What is Hanumanasana (Front Splits)?
Hanumanasana or Front Splits is a yoga posture that resembles a front split and is named after the deity Hanuman and his legendary leap. It deeply stretches the hamstrings of the front leg and hip flexors of the rear leg. This pose not only improves physical attributes but also fosters mental focus and embodies the qualities of perseverance and devotion, reflecting the epic leap made by Hanuman in Hindu mythology.
Hanumanasana Translation
Sanskrit: Hanumanasana
Pronunciation: Ha-nu-ma-na-sa-na
Meaning of Hanumanasana: “Hanuman” is a divine deity in the form of a monkey. He is known for his strength and devotion to the teachings of the divine. “Asana” means posture or comfortable seat. This yoga posture symbolises his leap, representing strength, devotion, and overcoming distance or obstacles.
Yoga Level: Advanced
Pose Type: Seated
Benefits: Stretches the hamstrings, hip flexors, and quadriceps.
Props: A blanket, yoga strap, and yoga blocks are useful to have when practising Hanumanasana.
Preparatory Poses For Hanumanasana (Monkey Pose)
Before attempting front splits, it’s crucial to prepare the body with specific poses. These will warm up and stretch the hips, hamstrings, and hip flexors, making the transition into Hanumanasana smoother and more effective. Start with poses like the Kneeling Lunge, Pigeon Pose, Standing Forward Bend, Warrior I, and Half Split to ensure your body is adequately prepared for the deep stretch of the Monkey Pose.
This pose effectively stretches the hip flexors in the hip of the rear leg. It’s an excellent foundational posture in preparing the hips for deeper postures such as Hanuamanasana.
")
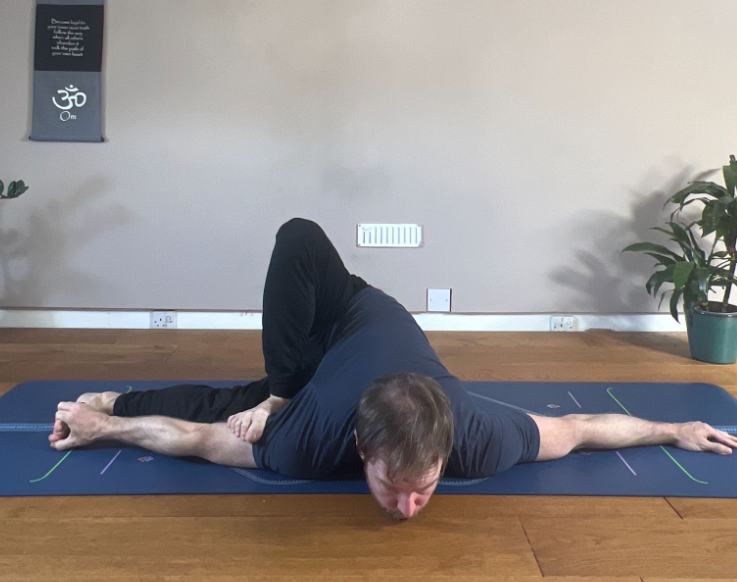
Pigeon Pose (Eka Pada Rajakapotasana): Known for its benefit for stretching the piriformis in the front hip and the hip flexors in the rear hip. This posture can aid in opening the hips for Hanumanasana.
")
Supta Padangusthasana:
This supine hamstring stretch is a great posture to stretch the necessary tissues required for Hanumanasana.

Builds strength in the legs as well as stretching the hip flexors of the rear hip. A great proprietary pose for Front Split.
")
Ardha Hanumanasana (Half Split) :
Not as intense as full front splits but certainly a prerequisite posture to include on your way to Hanumanasana.

Step-by-step instructions for Hanumanasana (Monkey Pose)
After warming up with preparatory poses, we’re now poised to delve into the steps of Hanuamanasana. Make your way through the steps below, as I’ll guide you through each phase, progressively making our way to Front Splits.
Step 1. Ardha Hanumanasana (Half-Splits):
")
Gradually Extend Your Front Leg:
Keeping your hands on blocks, start to slowly shift the front leg forward and the rear leg back.
Keep the back toes tucked under.
Keep the quadriceps in the front leg contracted.
Step 2. Slide Your Back Leg Backwards:

Gradually slide your left knee backward, extending your left leg behind you. Keep your left knee on the ground to help control the descent into the split.
Step 3. Square Your Hips:
As you lower towards the mat aim to square your hips towards the front of your mat. Use your hands for support and to adjust your hips as needed.
Step 4. Lower your body toward the Ground:
Respect any intense stretching signals your body is sharing with you. Please don’t push into exertion.
Keep the quadriceps muscle contracted in the front leg. Contract the Gluteus Maximus in the rear hip.
Step 5. Adjust Your Arms:
Once you’re comfortable in the position, you can bring your hands into a prayer position at your heart, raise them above your head, or keep them on the ground for support.
Step 6. Hold the pose:
While holding the stance for 30 to 60 seconds, take deep breaths. Instead of pushing the stretch, concentrate on unwinding into it.
")
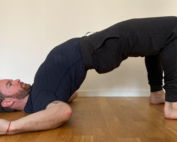
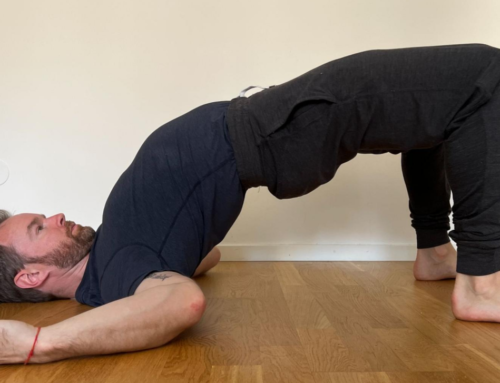
- To Release:
To come out of the pose, press your hands into the floor, tuck your back toes, and slowly lift your hips up and back from Downward Facing Dog. Switch sides.
Don’t do this if:
- Hip or hamstring injuries.
- Lower back issues.
- Limited flexibility without prior stretching.
- Any health condition that restricts movement or makes stretching painful.
Tips for beginners:
- It’s crucial to listen to your body and not rush into the full expression of the pose.
- Use props like blocks or a cushion under your pelvis if you’re not able to come into the full splits.
- Practice regularly, but allow your body time to open up gradually.
Hanumanasana Benefits
Hanumanasana offers a wide range of benefits for both the body and mind. Here are some of the key benefits.
- Improves Flexibility: Regular practice of Hanumanasana can significantly improve the flexibility of the hips. Particular muscles like the hamstrings and the hip flexors receive a deep stretch in Hanumanasana.
- Stimulates Abdominal Organs: Stretching in this stance stimulates the abdominal organs, which may improve digestion.
- Enhances Hip Mobility: By proficiently keeping a contraction in the muscle tissue of both the front and rear legs, the practitioner can build strength through the end-ranges of the hip joint aiding in hip mobility.
Hanumanasana Variations:
Understanding the variations of Hanumanasana is key to making the practice more accessible and tailored to practitioners’ individual needs. These variations help accommodate different flexibility levels, ensuring everyone can benefit in one way shape or form from Hanumanasana.
Variation 1. Ardha Hanumanasana

Ardha Hanumanasna with blocks offers a modified approach to Hanumanasana, ideal for those working on their flexibility. By placing blocks under each hand, practitioners can maintain balance and alignment while easing into the stretch. This variation allows for gradual deepening into the pose, making it accessible for those with tighter hamstrings, encouraging progress without strain.
Variation 2. Kneeling Lunge

The Kneeling Lunge variation is a great proprietary pose for Hanumanasana. This pose is great for accessing the passive range of motion in both the front and rear hips.
Starting from a kneeling position, the front leg is in hip flexion and the rear leg is in hip extension. Whilst in the Kneeling Lunge, apply around 30% effort through both legs by pressing both feet into the mat. This will help to keep a muscular tone through the legs which will aid in keeping the hips stable.
Variation 3. Standing Splits Against the Wall

This variation of standing splits is a great way to add into your Hanumanasana practice. This variation is particularly challenging and requires patience as well as a mindful approach when pushing deeper into the stretch. Due to use of the wall, and being able to use your arms to push the hips towards the wall, take your time and allow a steady breath paying attention to the signals you are receiving from the body in this variation.
Common Mistakes to Avoid:
- Not Squaring Hips: Keep your hips facing forward to maintain alignment.
- Pushing Too Far: Advance gradually to prevent overstretching and injury. Use props for support.
Contraindications and Cautions:
- Hamstring Sensitivity: If you have a history of hamstring injuries, approach this pose with caution or seek alternatives.
- Back Concerns: Those with back issues should modify the pose to avoid exacerbating their condition, perhaps consulting a healthcare professional or experienced yoga instructor for personalised advice.
Final Thought
There you have it, a comprehensive breakdown of Hanumanasana. This posture isn’t a pose that is going to come in the first few weeks of your yoga practice. It took me around two years of regular asana practice to get close to being able to do Hanumanasana. For me, one of the biggest teachings I learnt from this posture was humility and patience. Thanks for reading.
If you’re interested in deepening your practice, consider joining the Dav Jones Yoga membership online yoga classes on Patreon. If you’re looking for a more tailored/specific approach to your practice, then take a look at the Dav Jones Yoga mentorship program.


