 Skip to content

Explore Top 7 Side Plank Variations for Beginners to Advanced Practitioners
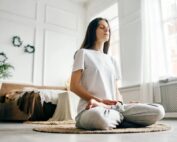
Welcome to Dav Jones Yoga’s guide on side Side Plank Variations! I’m Dav Jones, here to help you with your yoga practice. Whether you’re new to yoga or looking to improve your practice, I’m here to help provide insights into the practice of yoga. In this blog, we’ll take a look at Vasisthasana (Side Plank) and I’ll cover its benefits, how to do it safely step-by-step, and its variations. If you want to grow in your yoga asana practice, you’re in the right place. Let’s start this journey together.
Understanding Side Plank Variations
Side plank variations are integral components of both fitness routines and yoga practices, designed to target and strengthen the core, enhance balance, and increase overall body flexibility. These exercises are highly beneficial for athletes, yoga practitioners, and anyone looking to improve their physical health. This guide provides a detailed exploration of the side plank, or Vasisthasana, its benefits, and multiple variations that range from beginner to advanced levels.
Preparatory Pose for Side Plank Pose (Vasisthasana)
Before attempting the Side Plank Pose, it’s advisable to prepare your body sufficiently. Particular regions of the body I would suggest bringing awareness to would be the wrists, the outer hip muscles – mainly the gluteus medius – and the abdominals, particularly the external abdominal oblique.
Preparatory Poses:
- Parighasana (Gate Pose)
- Baby Half-Moon Pose.
- Trikonasana (Triangle Pose)
- Eka Pada Raja Kapotanasana (Pigeon Pose)
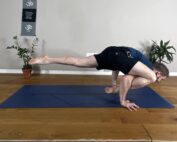
How do you do side plank Pose (Vasisthasana)?
We’re going to learn about the steps of performing the Side Plank Pose (Vasisthasana), a yoga pose focused on strength and balance. You can enter this posture from multiple positions, my favourite way to enter Side Plank is from ‘Easy Twist Pose.’
")
Including the Easy Twist Pose into your yoga practice before attempting the Side Plank Pose can significantly enhance your performance and enjoyment of the latter. It ensures that your body is properly warmed up, your spine is flexible, and your core muscles are engaged, all of which are essential for mastering the Side Plank Pose.
Now Let’s start with the Steps of Side Plank Pose
")
To perform the Side Plank Pose (Vasisthasana) effectively, follow these detailed steps:
- Start in Easy Twist Pose: Begin with your body in Easy Twist, keep your gaze down at your yoga mat.
- Shift Weight: Heel toe your front foot half way down to the middle of the mat, continue to press down through the foundation of the grounded arm and bottom foot. Keeping your attention down, carefully transfer the foot in the center of the mat to the bottom foot.
- Align and Elevate: Once you’re in Side Plank, lift the bottom hip and press down through the inner edge of the foot – base of the big toe – towards the mat. Option to reach the top arm for the ceiling and slowly shift your gaze towards the top hand.
- Focus on Breathing: Maintain a consistent breathing rhythm, inhaling and exhaling deeply, to help you focus and balance.
- Hold and Switch Sides: Hold the pose for a few breaths, then carefully transition back to the Plank Pose and repeat on the opposite side.
Benefits: Strengthens the shoulders, arms, legs, and core while improving balance.
Caution: Avoid this pose if you have shoulder or wrist injuries, as it places a significant load on these areas.
7 Side Plank Variations (From Easiest to Hardest)
Having explored the steps of the Side Plank Pose (Vasisthasana), we now turn our attention to its variations, allowing practitioners of all levels to tailor the pose to their needs and abilities. From modifications that simplify the pose for beginners to advanced variations that add complexity and intensity for seasoned yogis, Vasisthasana offers a range of options to enhance balance, strength, and flexibility.
1. Easy Twist Pose
The Side Plank Twist is a great preparatory pose and starting pose to begin in before moving into Side Plank. This posture rotates the spine helping to bring awareness to the abdominal oblique muscles. This position provides a chance to improve the stability of the supporting arm.
Steps:
- Initiate Twist: Press down through the heel of the hand in the supported arm and the front foot.
- Lift through the hips by straightening through the rear leg.
- Repeat: Spend five or more breaths then repeat on the other side.
Benefits: This posture rotates the spine, helping to bring awareness to the abdominal oblique muscles and lengthen the external rotator muscles in the hip of the front leg.
Avoid If: You have shoulder or lower back injuries, and this pose intensifies pressure on these areas.
2. Side Plank Pose Variation (One Knee On The Floor)
This Side Plank Pose Variation with one knee on the floor simplifies the traditional Side Plank, making it accessible for beginners or those seeking extra support. By placing the bottom knee on the floor, it lessens the load on the wrist, arm, and shoulder, aiding in balance and poise. Due to more points being in contact with the mat, this modification promotes an opportunity to work on fundamental muscle engagements to create stability throughout the posture.
")
Steps:
- Start in a side plank position.
- Lower the knee closest to the floor to the ground while leaving the other leg outstretched.
- Allow the supporting arm and hand a slight angle to reduce the load in the wrist.
- Lift your opposite arm towards the sky.
Benefits: This modification reduces the difficulty of the balance.
Avoid if: You have knee issues or severe wrist pain, as this variation still places pressure on these areas.
3. Side Plank / Parighasana Variation
The Side Plank Variation with a Raised Knee involves executing a Side Plank and then lifting the bottom knee towards the elbow of the supported arm. This engages obliques, and hip flexors, and enhances core stability. Ideal for advancing practitioners. More challenging than option 1.

Steps:
- Start in option 1, and press down firmly through the supported hand and bottom foot.
- Raise Knee: From this posture, slowly raise the bent leg knee to the elbow of the supporting arm.
- Hold and Switch: Hold the pose for a few breaths before switching sides.
Benefits: This variant strengthens the external abdominal obliques and increases push strength.
Avoid if: You have lower back issues, hip problems, or shoulder injuries, as this pose intensifies pressure on these areas.
4. Side Plank Pose Variation Legs Crossed
The Side Plank Pose Variation with Legs Crossed modifies the traditional Side Plank by crossing the top leg in front of the bottom one, foot grounded. This position increases stability and is a gentler introduction to the traditional Vasisthasana.

Steps:
- Start in the Easy Twist Pose (Option 1): Heel-toe the front foot halfway down the mat.
- Press down through the supported arm and bottom outer foot to maintain stability in the posture.
- Continue to heel-toe the front foot so it places in front of the rear foot.
- Stabilise and Hold: Breathe here for 5 breaths or more, and keep the gaze on the floor. If you feel confident, have a go at looking up to the top hand.
Benefits: This variation enhances balance and stability by providing a wider base, making it accessible for beginners.
Avoid If: Take extra care if you’re dealing with wrist or rotator cuff (shoulder) compensations.
5. Side Plank Abducted Leg.
The Side Plank Abducted leg is a challenging yoga pose variation of the traditional Side Plank, where the practitioner abducts the hip of the top leg. This pose requires extra focus and push strength through the supported arm and bottom hip.
This variation offers a comprehensive challenge for the entire body, not only in terms of strength but also in terms of technique and focus.

Steps:
- Start in Side Plank: Begin in a standard Side Plank. Keep your focus on a fixed point on the floor. Push down through the supported arm and lift the bottom hip upwards. This will shorten the external abdominal oblique muscles at the bottom side of the body, helping to create hip stability in the bottom hip.
- Extend Limbs: Keeping the technique mentioned in the first point, slowly abduct your top leg and arm vertically upwards. Option to slowly turn your gaze to the top hand.
- Maintain the pose for 5 breaths and repeat on the other side.
Benefits: This variation improves balance and strengthens the core, legs, and arms.
Caution: If you have wrist, shoulder, or hip problems, modify this variation since it exerts a large strain on these regions.
6. Side Plank Tree Variation
The Side Plank Tree Variation is a hybrid yoga pose that blends the Side Plank’s balancing attributes with the external rotation of the hip from the tree pose. Practitioners achieve this by placing the top foot on the inner thigh of the supporting leg, challenging both balance and hip mobility.

Steps:
- Start in Side Plank: Begin in a traditional Side Plank Pose on one side.
- Find option 6 – Side Plank with Abducted Leg.
- Externally rotate the top leg by turning the toes up.
- Adjust Leg Position: Bend at the knee and place the sole of your top foot against the inner thigh of the bottom leg, mimicking the Tree Pose leg position.
- Balance and Hold: Maintain the posture for 5 breaths or more and then repeat on the other side.
Benefits: This variation is challenging and can help to build strength and focus along with your active range of motion for hip mobility.
Caution: Because this position needs both hip opening and knee stability, it is best avoided if you have severe hip or knee problems.
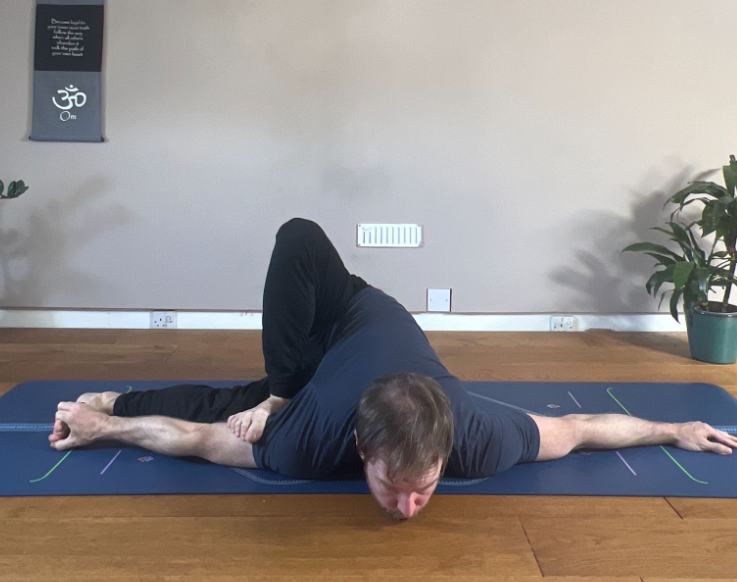
7. Side Plank Split Variation
“Side Plank Split Variation” is an advanced variation of the traditional Side Plank Pose, designed to enhance the challenge by modifying the leg position. This typically involves externally rotating and abducting to the top leg and taking the foot with the top hand. This pose requires ample hip flexibility, and stable arm, leg, and hip strength.

Steps:
- Start in Side Plank: Bend into the bottom knee and firmly root down through the sole of the bottom foot. Aim to feel contact through the base of the big toe and the inner heel.
- With the top hand, collect the top foot. Keep hold of the foot, bending at the knee bringing the thigh towards the body.
- During this balancing process, keep your gaze fixed to the floor and keep pressing through the supported foot and supported hand.
- Slowly start to straighten the top leg. You will feel a stretch in the inner and posterior thighs.
- Work on lifting the lower hip, and then, if you have enough balance, begin to gaze up at the upper hand and foot.
Benefits: Improves balance and flexibility in the legs while increasing strength in the abdominals, outer hip muscles, and arms.
Avoid If: You have hip, knee, or ankle conditions, as this pose demands increased load on these regions of the body.
Exploring the Benefits of Side Plank Exercises
Performing side planks regularly can offer a wide range of health benefits. The primary advantage is the strengthening of the core muscles, which supports better posture and reduces the risk of back pain. Additionally, this exercise enhances muscle endurance and promotes fat burning by increasing metabolic rate. The psychological benefits include improved concentration and stress reduction, as maintaining the pose requires focus and steady breathing.
Incorporating Side Planks into Your Workout Routine
Integrating side planks into your fitness regime can significantly enhance core strength and contribute to overall body stability. For effective results, incorporate side plank variations into your routine three to four times a week, gradually increasing the duration and complexity of the poses.
Safety Tips and Injury Prevention in Side Plank Exercises
Proper form is crucial in preventing injuries during side plank exercises. Key points include:
- Ensuring the supporting arm is correctly aligned with the shoulder to avoid strain.
- Engaging the core throughout the exercise to support the spine.
- Avoiding sagging hips to maintain proper body alignment.
Adaptations and Modifications for Different Skill Levels
Side planks can be adapted to any fitness level. Modifications like the knee-down position or forearm support make the exercises accessible to beginners, while advanced practitioners can add movements or increase the hold time to intensify the challenge.
Final Thought:
Whether you’re taking your first steps into the world of yoga or you’re an experienced practitioner seeking to deepen your skills, our online classes provide tailored instruction for mastering the Side Plank Pose Variations. Connect with Dav Jones Yoga on the Patreon channel or have a look at the DJY Mentorship programs for a more private, tailored approach to exploring your yoga practice. Learn how we can support your journey toward achieving strength, balance, and focus through this powerful posture.


